

Growing microgreens indoors is an easy and rewarding way to enjoy fresh, nutritious greens throughout the year. These young vegetable and herb seedlings grow quickly, require minimal space, and can be harvested within one to three weeks, depending on the variety.
Whether you live in an apartment or have limited gardening space, learning how to grow microgreens indoors allows you to produce fresh food using simple gardening supplies. With suitable seeds, proper lighting, consistent moisture, and a shallow growing tray, you can establish a productive indoor microgreen garden.
What Are Microgreens?
Microgreens are young edible plants harvested shortly after their first seed leaves develop or when their first true leaves begin to appear. They are larger than sprouts but smaller than baby greens and offer distinctive flavors, colors, and textures.
Unlike sprouts, microgreens are generally grown in soil or another growing medium and require light after germination. Their stems and leaves are harvested above the growing medium and commonly used in salads, sandwiches, soups, and other dishes.
Best Microgreens to Grow Indoors
Choosing suitable seeds makes indoor microgreen gardening easier, especially for beginners. Some varieties germinate quickly, while others require additional attention and longer growing periods. Consider growing several varieties separately to discover which flavors and textures you enjoy most.
| Microgreen | Harvest Time | Flavor |
|---|---|---|
| Radish | 5–10 days | Spicy and peppery |
| Broccoli | 7–12 days | Mild and earthy |
| Mustard | 7–12 days | Sharp and spicy |
| Sunflower | 8–14 days | Nutty and crunchy |
| Pea shoots | 10–14 days | Sweet and fresh |
| Kale | 8–12 days | Mild and earthy |
| Arugula | 7–12 days | Peppery |
| Cabbage | 7–12 days | Mild and sweet |
| Basil | 15–25 days | Sweet and aromatic |
| Beet | 12–21 days | Earthy and slightly sweet |
Actual harvesting times depend on temperature, lighting, seed quality, and growing conditions. Radish, broccoli, and cabbage microgreens are particularly suitable for beginners.
What Do You Need to Grow Microgreens Indoors?
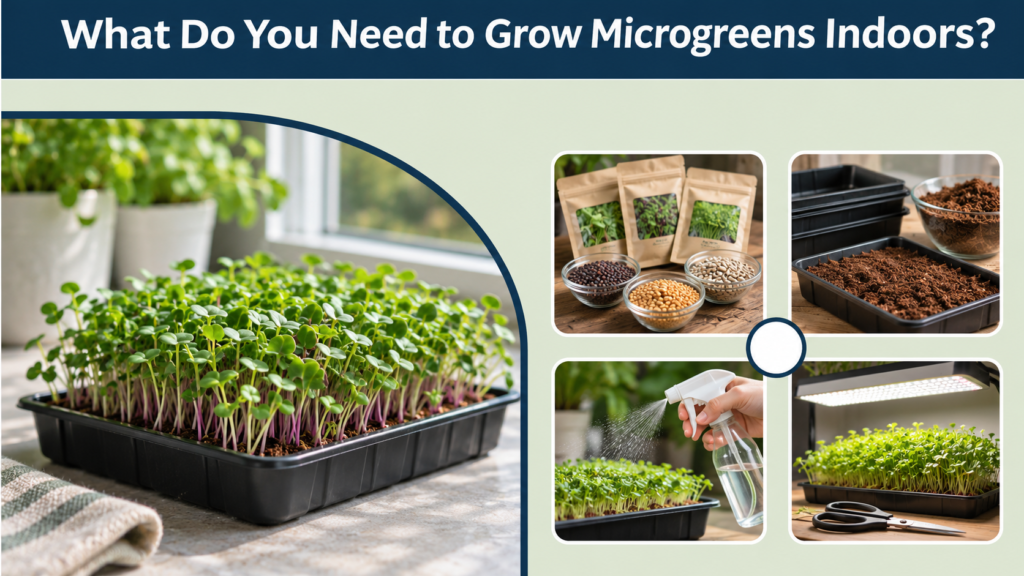
Growing microgreens does not require expensive gardening equipment or a large indoor greenhouse. Most supplies are affordable and reusable, making it possible to establish a productive growing system on a kitchen countertop, windowsill, or shelving unit.
Essential growing supplies include:
- Microgreen seeds: Untreated seeds suitable for edible microgreen production.
- Growing trays: Shallow containers with drainage holes.
- Watering trays: Solid-bottom trays for bottom watering.
- Growing medium: Potting mix, coconut coir, or specialized growing mats.
- Spray bottle: For gently moistening seeds during germination.
- Grow lights: LED lights for locations with insufficient sunlight.
- Clean scissors: For harvesting mature microgreens.
- Tray cover: For maintaining moisture during initial germination.
How to Grow Microgreens Indoors Step by Step
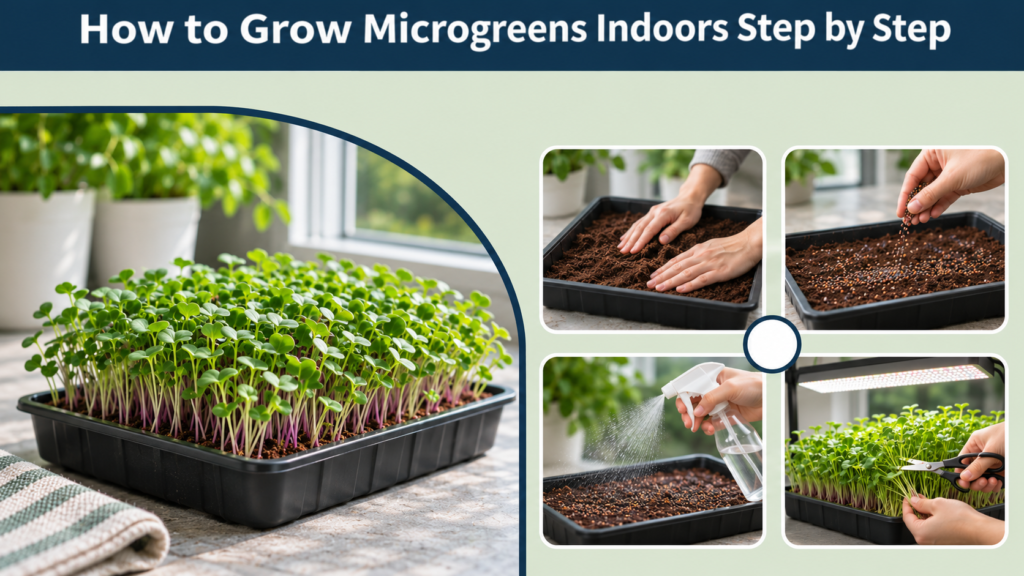
Microgreens grow successfully when their basic requirements are consistently maintained throughout the growing cycle. Preparing the growing medium properly, sowing seeds evenly, and managing moisture are particularly important for healthy development. Follow these steps to establish your indoor microgreen garden.
1. Choose the Right Growing Container
Select a shallow growing tray approximately one to two inches deep with adequate drainage holes. Place it inside a solid-bottom tray to collect excess water and make bottom watering easier.
Clean and sanitize reusable containers before planting to reduce the risk of mold and bacterial contamination.
2. Prepare the Growing Medium
Fill the container with approximately one inch of fresh potting mix or hydrated coconut coir. Spread the medium evenly and gently level its surface without compacting it excessively.
Moisten the growing medium before planting so that it feels evenly damp but not waterlogged.
3. Prepare the Microgreen Seeds
Most small seeds, including broccoli, radish, mustard, and kale, can be planted directly without soaking. Larger seeds, such as peas and sunflowers, often benefit from soaking for approximately 6–12 hours.
Follow the seed supplier’s instructions because soaking requirements vary between varieties. Drain soaked seeds thoroughly before planting.
4. Sow the Seeds Evenly
Scatter the seeds evenly across the growing medium. Microgreens can be planted more densely than mature vegetables, but excessive overcrowding can restrict airflow and encourage mold.
Gently press the seeds against the growing surface to improve contact with moisture. Most varieties do not require a thick covering of soil.
5. Cover the Growing Tray
Cover the tray with another clean tray or suitable cover to retain moisture and support germination. Many microgreen varieties benefit from an initial dark period of approximately two to four days.
Check the seeds daily and mist lightly when necessary. Remove the cover once most seeds have germinated and seedlings begin developing.
6. Provide Adequate Lighting
Move the seedlings to a bright windowsill or position them beneath LED grow lights. Providing approximately 12–16 hours of artificial light daily supports compact, healthy growth.
Adjust the distance between the lights and seedlings according to the manufacturer’s recommendations to prevent excessive stretching or heat damage.
7. Water the Microgreens Regularly
Once seedlings develop roots, begin bottom watering by adding water to the solid tray underneath. This allows the growing medium to absorb moisture while keeping the foliage relatively dry.
Remove excess standing water after the medium becomes sufficiently moist. Check moisture levels daily because shallow growing trays can dry out quickly.
8. Harvest the Microgreens
Harvest microgreens when they reach their appropriate size, usually after their seed leaves expand or first true leaves begin developing. Most common varieties are ready within 7–14 days.
Use clean, sharp scissors to cut the stems just above the growing medium. Avoid including roots, soil, or damaged seedlings in your harvest.
Ideal Growing Conditions for Indoor Microgreens
Microgreens generally adapt well to ordinary indoor environments. However, maintaining suitable temperature, lighting, moisture, and airflow improves germination rates and overall plant quality. Sudden environmental changes or excessive humidity can negatively affect seedling development.
| Growing Factor | Recommended Conditions |
|---|---|
| Temperature | 65–75°F (18–24°C) |
| Lighting | 12–16 hours daily under grow lights |
| Growing medium | Moist and well-drained |
| Humidity | Approximately 40–60% after germination |
| Soil depth | Approximately 1 inch |
| Air circulation | Gentle and consistent |
| Fertilizer | Usually unnecessary for short growing cycles |
How to Grow Microgreens Indoors Without Soil
Microgreens can also be grown using hydroponic growing methods. Coconut coir, hemp mats, cellulose pads, and other food-safe growing mediums provide alternatives to traditional potting soil.
Place the growing mat inside a shallow tray and moisten it thoroughly before distributing seeds evenly. Cover the tray during germination, then expose the seedlings to adequate light once they emerge.
Maintain consistent moisture without allowing the roots to remain submerged. Supplemental nutrients may benefit certain varieties or longer growing cycles, depending on the growing medium.
Common Microgreen Growing Problems and Solutions

Indoor microgreens occasionally develop problems because of excessive moisture, insufficient lighting, poor ventilation, or unsuitable planting density. Identifying these issues early helps prevent crop losses and improves future harvests.
Mold Growth
Mold commonly develops in excessively humid, overcrowded, or poorly ventilated growing trays. Improve airflow, reduce watering, and avoid planting seeds too densely.
Fine white root hairs can resemble mold but are a normal part of root development. Discard the affected crop if actual mold or spoilage is present.
Poor Seed Germination
Old seeds, unsuitable temperatures, and inconsistent moisture can reduce germination rates. Purchase fresh seeds from reputable suppliers and maintain evenly moist growing conditions.
Tall and Weak Seedlings
Microgreens may become long, thin, and weak when they receive insufficient light. Increase light exposure or adjust the grow light position to encourage stronger growth.
Yellow Microgreen Leaves
Yellow leaves may develop because of insufficient light, excessive watering, or prolonged periods under a germination cover. Provide adequate lighting and ensure the growing medium drains properly.
Wilting Microgreens
Wilting often occurs when the growing medium becomes too dry or indoor temperatures become excessive. Check moisture levels regularly and keep trays away from direct heat sources.
How to Harvest and Store Microgreens Properly
Harvest microgreens using clean scissors when the foliage is dry and healthy. Cutting the stems above the growing medium helps prevent soil and root contamination.
Store harvested microgreens in a clean, dry food-safe container lined with a paper towel. Refrigerate them at 40°F (4°C) or below and consume them within approximately five to seven days, depending on freshness and variety.
Wash microgreens gently under clean running water immediately before eating. Discard any greens that become slimy, discolored, moldy, or develop an unpleasant smell.
Frequently Asked Questions
1. Can you grow microgreens indoors all year round?
Yes, microgreens can be grown indoors throughout the year using suitable lighting, temperature, and moisture conditions. LED grow lights make year-round cultivation particularly convenient, even during winter when natural sunlight is limited.
2. Do microgreens need direct sunlight?
Microgreens do not necessarily require direct sunlight to grow successfully. Bright natural light or suitable LED grow lights can support healthy development. Avoid prolonged exposure to intense sunlight that may overheat the seedlings or dry out their growing medium.
3. Do microgreens regrow after cutting?
Most microgreens do not regrow successfully after harvesting because their growing points are removed. Pea shoots may produce limited additional growth when cut above a viable node, but planting fresh seeds generally provides more consistent harvests.
4. How often should you water indoor microgreens?
Indoor microgreens usually require daily moisture checks, although watering frequency depends on temperature, humidity, and the growing medium. Bottom watering is recommended after germination because it helps maintain root moisture while reducing excessive water on the foliage.
5. Do microgreens need fertilizer to grow indoors?
Most microgreens do not require additional fertilizer because their seeds contain sufficient nutrients for short growing cycles. However, slower-growing varieties cultivated in nutrient-free mediums may benefit from a suitable diluted nutrient solution.